|
|
||
|
|
|
|
|
|
|
GST System Project: User Manual: Registration as Tax Collector |
|
|
|
Goods and Services Tax Network |
|
6/16/2017 |
||
|
|
|
Version No. |
1.0 |
|
Authorized by |
Snigdha Tayal |
Confidentiality Agreement
“This document contains proprietary information exclusively vests with GSTN. This document may not, in whole or in part, be copied, photocopied, stored, saved, reproduced, replicated, disseminated, translated, transmitted or reduced to in any medium (whether electronic, mechanical, machine-readable and/or any other tangible or intangible form of any nature), by the intended recipient/s or user/s without the express consent, in writing, from the Authorized Representative of GSTN Management.”
All the Intellectual Property Rights (i.e. copyrights) as may be available under the applicable laws, pertaining to GSTN’s confidential information, shall exclusively vest with GSTN only, and any breach thereof shall be subject to indemnification
Revision History
|
Version |
Date |
Author |
Reviewer |
Approver |
Comments |
|
0.01 |
31/05/2017 |
Tanmay Sahay |
Khushboo Jain |
Snigdha Tayal |
Initial Draft |
|
1.0 |
6/16/2017 |
Tanmay Sahay |
Snigdha Tayal |
Snigdha Tayal |
Delivered to GSTN |
|
|
|
|
|
|
|
|
|
|
|
|
|
|
|
|
|
|
|
|
|
|
|
|
|
|
|
|
Table of Contents
1.3 Intended Audience for this document
2. Registration as Tax Collector
2.1 Applying for Registration as a Tax Collector on the GST Portal
3. Collaborations and dependencies
4. Assumptions and constraints
1. Introduction
1.1 Scope of the document
This document covers the User Manual for Registration as Tax Collector under the provisions of GST Act.
1.2 Purpose of the document
This document will be hosted on the Help section of the GST System Portal, in HTML format. The document will help the users of the GST System Portal to understand and easily use the GST System Portal.
1.3 Intended Audience for this document
This document is intended for use by the GST Services team for validation of content and for Infosys Training team to design HTML based user manual.
2. Registration as Tax Collector
2.1 Applying for Registration as a Tax Collector on the GST Portal
How can I apply for Registration as a Tax Collector?
What are the steps involved in applying for Registration as a Tax Collector (e-commerce) on the GST Portal?
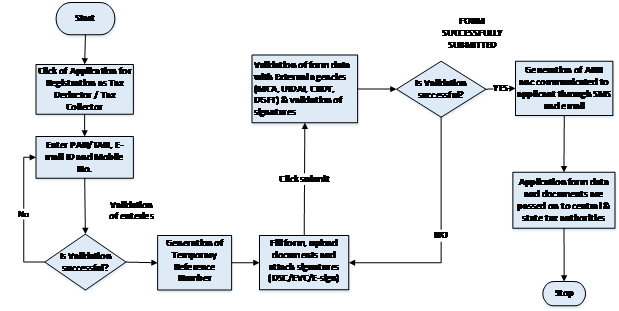
For registering yourself as a Tax Collector on the GST Portal, perform the following steps:
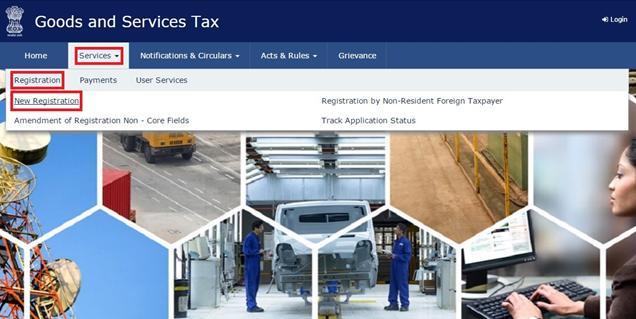
1. Access the https://www.gst.gov.in/ URL. The GST Home page is displayed.
2. Click the REGISTER NOW link.
Alternatively, you can also click Services > Registration > New Registration option.
Part A:
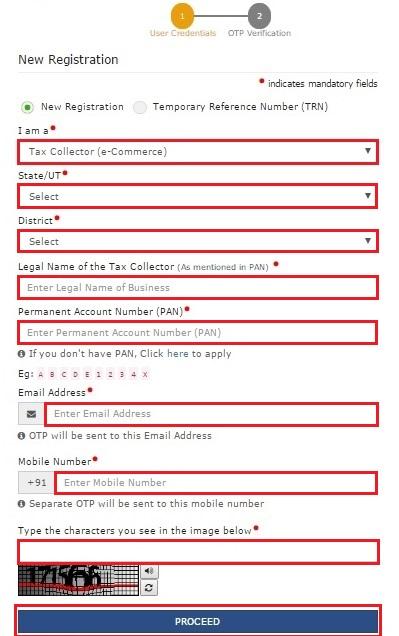
3. The New Registration page is displayed. Select the New Registration option.
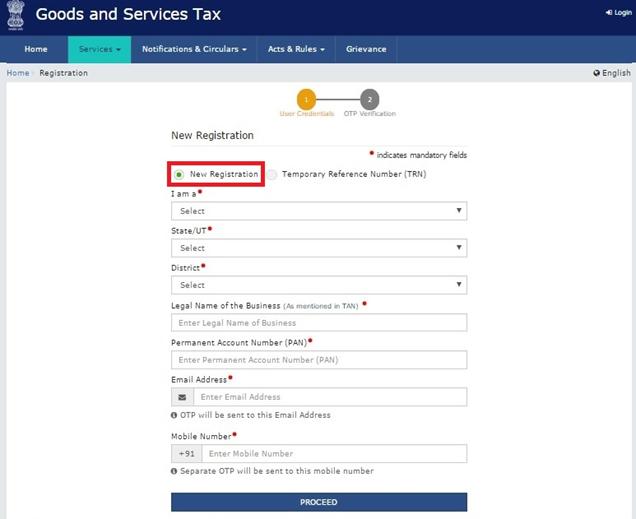
4. In the I am a drop down list, select the Tax Collector as the type of taxpayer to be registered.
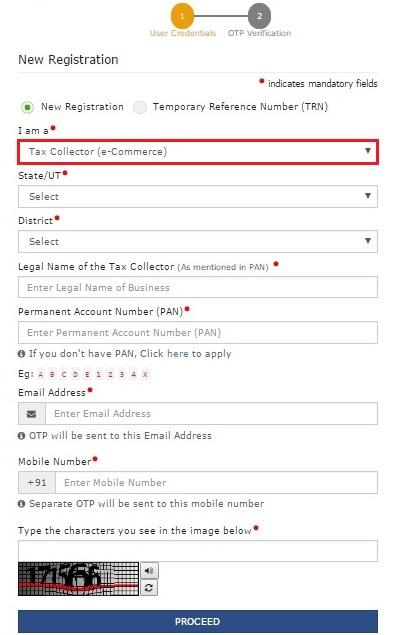
5. In the State/UT and District drop down list, select the state for which registration is required and district.
6. In the Legal Name of the Tax Collector (As mentioned in PAN) field, enter the legal
name of your Tax Collector as mentioned in the PAN database.
7. In the Permanent Account Number (PAN) field, enter PAN number.
Note:
• In case you don’t have PAN, you can apply for PAN. To do so, click the here link.
8. Legal Name of the Tax Collector and PAN will be validated against the CBDT database.
9. In the Email Address field, enter the email address of the Primary Authorized Signatory.
10. In the Mobile Number field, enter the valid Indian mobile number of the Primary Authorized Signatory.
Note: Different One Time Password (OTP) will be sent on your email address and mobile number you just mentioned for authentication.
11. In the Type the characters you see in the image below field, enter the captcha text.
12. Click the PROCEED button.
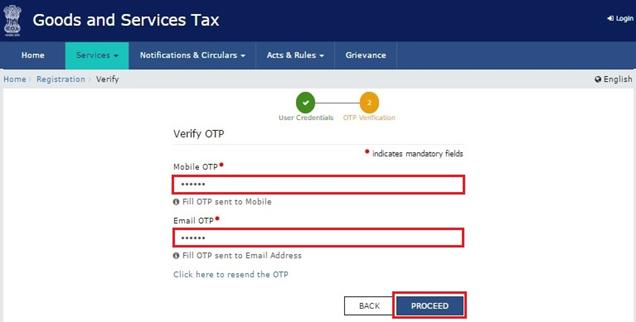
After successful validation, you will be directed to the OTP Verification page.
13. In the Mobile OTP field, enter the OTP you received on your mobile number entered in PART-A of the form. OTP is valid only for 10 minutes.
14. In the Email OTP field, enter the OTP you received on your email address entered in PART-A of the form. OTP is valid only for 10 minutes.
Note: OTP sent to mobile number and email address are separate. In case OTP is invalid, try again by clicking the Click here to resend the OTP link. You will receive the OTP on your registered mobile number or email ID again. Enter both the newly received OTPs again.
15. Click the PROCEED button.
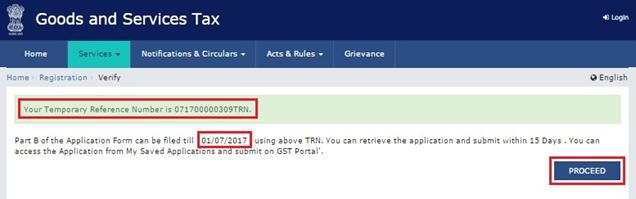
16. The system generated 15-digit Temporary Reference Number (TRN) is displayed.
Note: You will receive the TRN acknowledgment information on your e-mail address
as well as your mobile number. Note that below the TRN the expiry date of the TRN will also be mentioned. Click the PROCEED button.
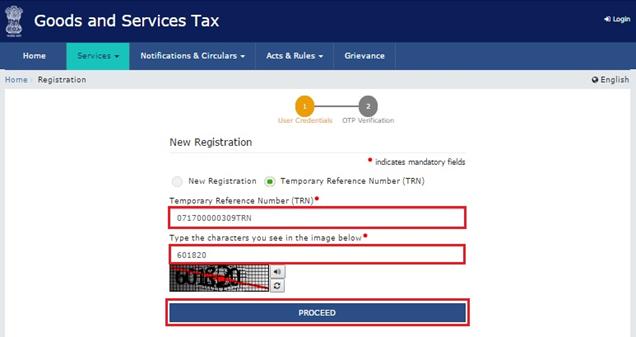
Alternatively, you can also click Services > Registration > New Registration option
and select the Temporary Reference Number (TRN) radio button to login using the TRN.
PART B:
1. In the Temporary Reference Number (TRN) field, enter the TRN generated.
2. In the Type the characters you see in the image below field, enter the captcha text.
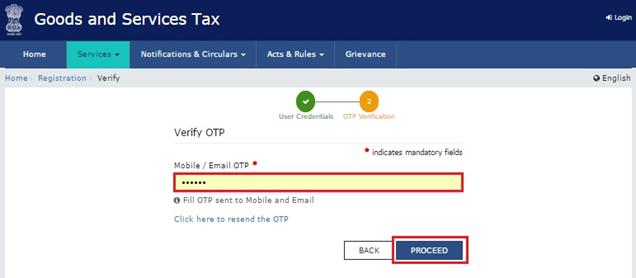
3. Click the PROCEED button. The Verify OTP page is displayed. You will receive same Mobile OTP and Email OTP. These OTPs are different from the OTPs you received in previous step.
4. In the Mobile / Email OTP field, enter the OTP you received on your mobile number and email address. OTP is valid only for 10 minutes.
Note: OTP sent to mobile number and email address are same.
In case OTP is invalid, try again by clicking the Click here to resend the OTP link. You will receive the OTP on your registered mobile number or email ID again. Enter the newly received OTP again.
5. The My Saved Application page is displayed. Under the Action column, click the Edit icon (icon in blue square with white pen).
Note:
· Notice the expiry date shown below in the screenshot. If the applicant doesn’t submit the application within 15 days, TRN and the entire information filled against that TRN will be purged after 15 days.
· The status of the registration application is ‘Draft’ unless the application is submitted. Once the application is submitted, the status is changed to ‘Pending for
Validation’.

6. The Registration Application form with various tabs is displayed that must be filled sequentially. PART-B of the form has four sections that must be filled sequentially.
On the top of the page, the four tabs are displayed - Business Details, Authorized Signatory, Office Address of Tax Collector, and Verification. Click on the relevant tab to enter the details.
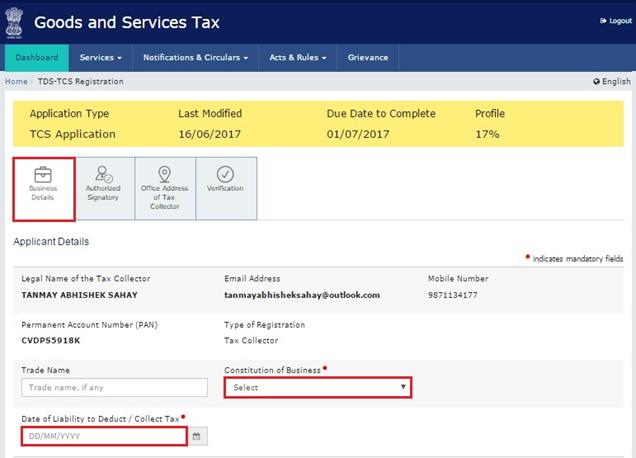
Business Details tab:
The Business Details tab is selected by default. This tab displays the information
to be filled for the business details required for registration.
a) In the Trade Name field, enter the trade name of your business.
Note: Trade name of the business is different from the legal name of the business.
b) In the Constitution of Business drop-down list, select the type of constitution of your business. This will be validated with the CBDT Database for a match with the PAN entered in Part A of the form.
c) Select the Date of Liability to Deduct / Collect Tax using the calendar.
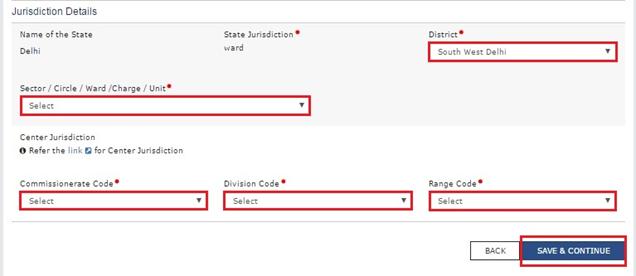
d) In the District drop-down list, select the district of your business.
e) In the Sector/ Circle / Ward/ Charge/ Unit drop-down list, select the appropriate choice.
f) In the Commissionerate Code, Division Code and Range Code drop-down list, select the appropriate choice.
g) Click the SAVE & CONTINUE button. You will notice a blue tick on the Business Details section indicating the completion of the tab information and notice the Profile indicating the percentage completion of the application form.
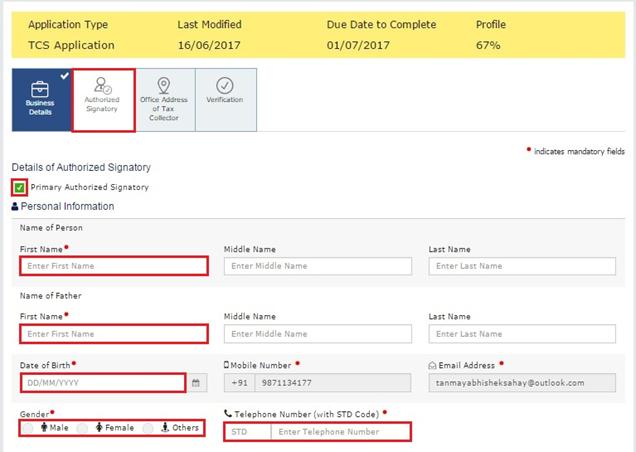
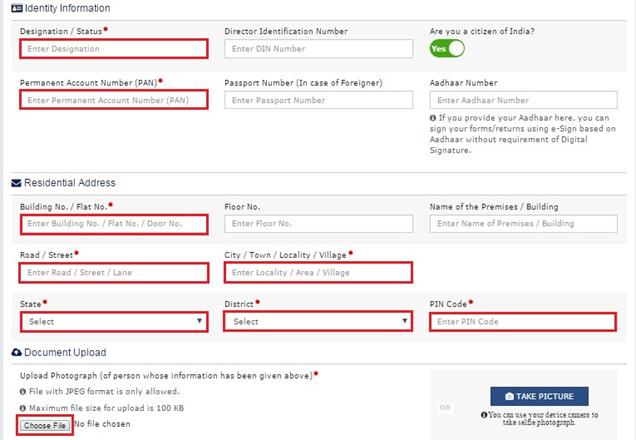
Authorized Signatory tab:
This tab page displays the details of the authorized signatory. You can enter details of up to 10 authorized signatories, enter all the details of the authorized signatory and click SAVE AND CONTINUE at the bottom of the screen.

Office Address of Tax Collector Tab:
The third section is the Office Address of Tax Collector. Please enter the following details:
a. Address
b. Contact Information
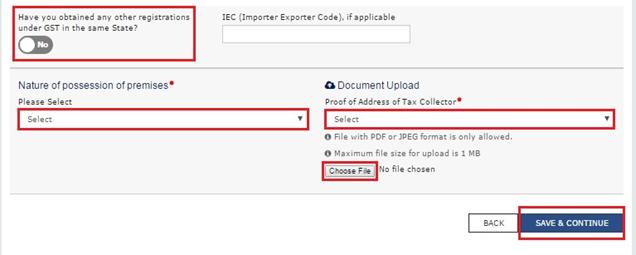
c. You must also enter details of any other GST Registrations in the same state if applicable
d. Nature of Possession of Premises (to be selected from the dropdown)
e. Upload the supporting document in the prescribed format for proof of Nature of Possession of Premises
f.
Click SAVE AND CONTINUE. 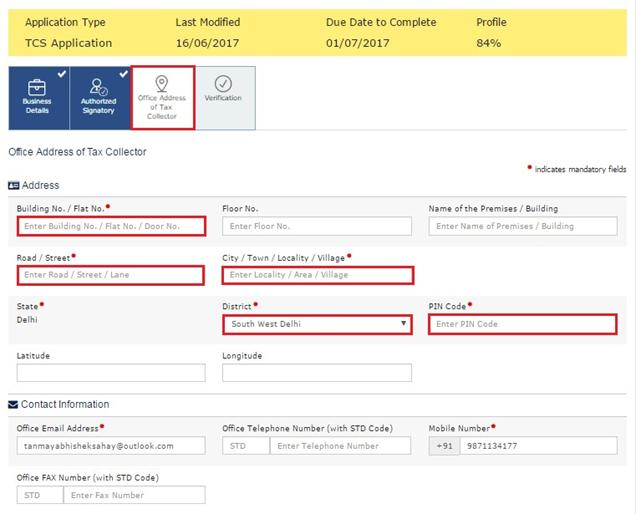
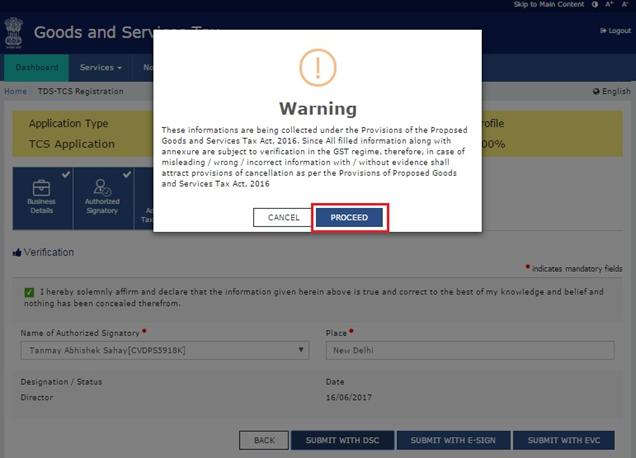
Verification tab:
This tab page displays the details of the verification for authentication of the
details submitted in the form.
a) Select the Verification checkbox.
b) In the Name of Authorized Signatory drop-down list, select the name of authorized signatory.
c) In the Place field, enter the place where the form is filed.
d) After filling the enrolment application, you need to digitally sign the application
using Digital Signature Certificate (DSC) or E-Signature. Submission of application
with the details is NOT completed unless DSC or E-Signature is affixed.
Note:
· For E-Sign and EVC you must update your Aadhaar number in the Applicant Details section.
· After submission, you cannot make any changes to your application.

In Case of DSC:
e) Click the SUBMIT WITH DSC button.
f) Click the PROCEED button.
Note:
· Make sure your DSC dongle is inserted in your laptop/ desktop.
· Make sure emSigner (from eMudra) is running on your laptop/ desktop with administrator permissions.
To check if the emSigner is running on your laptop/ desktop, perform the following
steps:
1. Click the item tray.
2. Double click the emSigner icon.
3. Click the Hide Service button to minimize the dialog box.
g) Select the certificate and click the SIGN button.
Note: To view the details of your DSC, click the View Certificate button.
You will receive the acknowledgement in next 15 minutes on your registered e-mail
address and mobile phone number. Application Reference Number (ARN) receipt is sent
on your e-mail address and mobile phone number.
You can track the status of your application using the Services > Registration >
Track Application Status command.
In Case of E-Signature:
e) Click the SUBMIT WITH E-SIGN button.
f) In the Declaration box, click the AGREE button.
Note: OTP will be sent to your e-mail address and mobile phone number registered
with Aadhaar.
g) Verify Aadhaar OTP screen is displayed. Enter the OTP received on your e-mail
address and mobile phone number registered with Aadhaar.
h) Click the CONTINUE button.
The success message is displayed. You will receive the acknowledgement in next 15
minutes on your registered e-mail address and mobile phone number. Application Reference Number (ARN) receipt is sent on your e-mail address and mobile phone number.
In Case of Electronic Verification Code:
e) Click the SUBMIT WITH EVC button.
f) In the Declaration box, click the AGREE button.
Note: OTP will be sent to your mobile phone number registered with Aadhaar.
g) Verify OTP screen is displayed. Enter the OTP received on your mobile phone number registered with Aadhaar.
The success message is displayed. You will receive the acknowledgement in next 15
minutes on your registered e-mail address and mobile phone number. Application Reference Number (ARN) receipt is sent on your e-mail address and mobile phone number.
3.1 Collaborations
|
Sr. |
Collaboration required with |
|
1. |
Domain Team |
|
2. |
Services Team |
3.2 Dependencies
|
Sr. |
Modules |
Reference/ Functionalities |
|
1 |
SRS |
|
|
2 |
SIT environment readiness for verification of content with application |
|
|
3 |
UAT completion |
|
4. Assumptions and constraints
4.1 Assumptions
|
Sr. |
Assumption |
|
1 |
Post UAT completion , the training content will be verified with the UAT environment |
4.2 Constraints
|
Sr. |
Constraint |
|
1 |
Content cannot be finalized before the UAT completion |
5. Glossary
|
SI. No |
Term / Acronym |
Description |
|
1 |
API |
Application Program Interface |
|
2 |
ARN |
Acknowledgment Reference Number |
|
3 |
B2B |
Business to Business |
|
4 |
B2C |
Business to Consumer |
|
5 |
BO |
Back Office |
|
6 |
BRN |
Branch Receipt Number |
|
7 |
CBDT |
Central Board of Direct Taxes |
|
8 |
CBEC |
Central Board of Excise & Customs |
|
9 |
CC |
Credit Card |
|
10 |
CIN |
Challan Identification Number |
|
11 |
CPIN |
Common Portal Identification Number |
|
12 |
DC |
Debit Card |
|
13 |
DSC |
Digital Signature Certificate |
|
14 |
e-FPB |
Electronic Focal Point Branch |
|
15 |
EOD |
End of the Day |
|
16 |
FC |
Facilitation Centre |
|
17 |
FO |
Front Office |
|
18 |
GDI |
Government department unique ID where department does not have GSTIN |
|
19 |
GSP |
GST Suvidha Providers |
|
20 |
GSTIN |
Goods and Services Taxpayer Identification Number |
|
21 |
GSTN |
GST Network |
|
22 |
HSN |
Harmonized System of Nomenclature for goods |
|
23 |
M |
Tax Period |
|
24 |
M+1 |
Month succeeding the tax period |
|
25 |
MCA |
Ministry of Corporate Affairs |
|
26 |
OTP |
One Time Password |
|
27 |
PAN |
Permanent Account Number |
|
28 |
POS |
Place of Supply of Goods or Services – State code to be mentioned |
|
29 |
SAC |
Service Accounting Code |
|
30 |
UIN |
Unique Identity Number for UN Bodies |
|
31 |
UIDAI |
Unique Identification Authority of India |
6. Appendices
6.1 Open items
The following table lists all the open items in this document:
|
ID |
Item |
Responsibility |
Status |
|
1 |
|
|
|
|
2 |
|
|
|
|
3 |
|
|
|
|
4 |
|
|
|
|
5 |
|
|
|
|
6 |
|
|
|
|
7 |
|
|
|
|
8 |
|
|
|
Table 1. Open Items
6.2 Comments Matrix
Since there is no formal tool finalized currently for logging comments on various document deliverables, Comments Matrix is being put here to ensure comments are being tracked and resolved. Once a formal tool is identified, this process might change for future deliverables.
|
S. No. |
GSTN Review Comments |
Date Raised |
Infosys Remarks |
|
1 |
|
|
|
|
2 |
|
|
|
Table 2. Comments Matrix